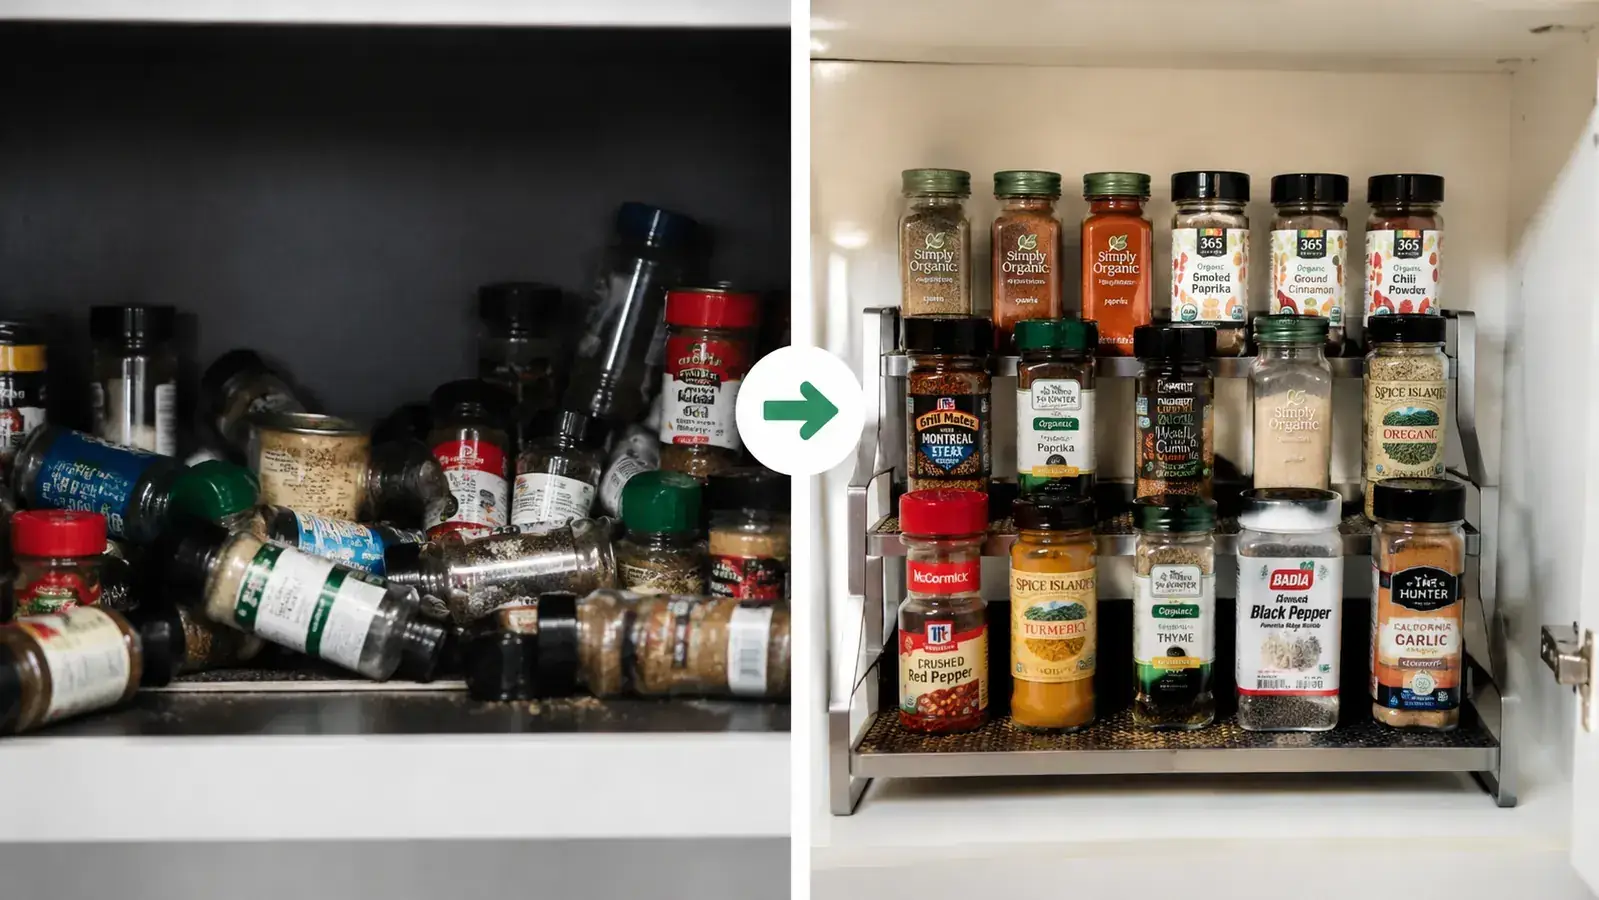
If you have ever stood in front of your spice cabinet hunting for smoked paprika while three jars of cumin tumble onto the counter, you know the problem. It is not that you have too many spices. It is that every jar is the same height, sitting in a flat row, and the one you need is always in the back. A single tiered shelf riser fixes this almost embarrassingly fast. I reorganized my pantry cabinet in about twenty minutes using a Copco 3-Tier Spice Rack and I genuinely stood there for a moment just admiring it when I was done. That almost never happens to me.
The good news is this project requires zero tools, zero special skills, and barely any time. You pull everything out, wipe the shelf, set the rack in place, and put things back in height order. That is the whole method. The steps below fill in the details that make the difference between a cabinet that looks good on day one and one that actually stays organized for months.
Still hunting for spices in a flat pile? One tiered rack fixes the whole shelf.
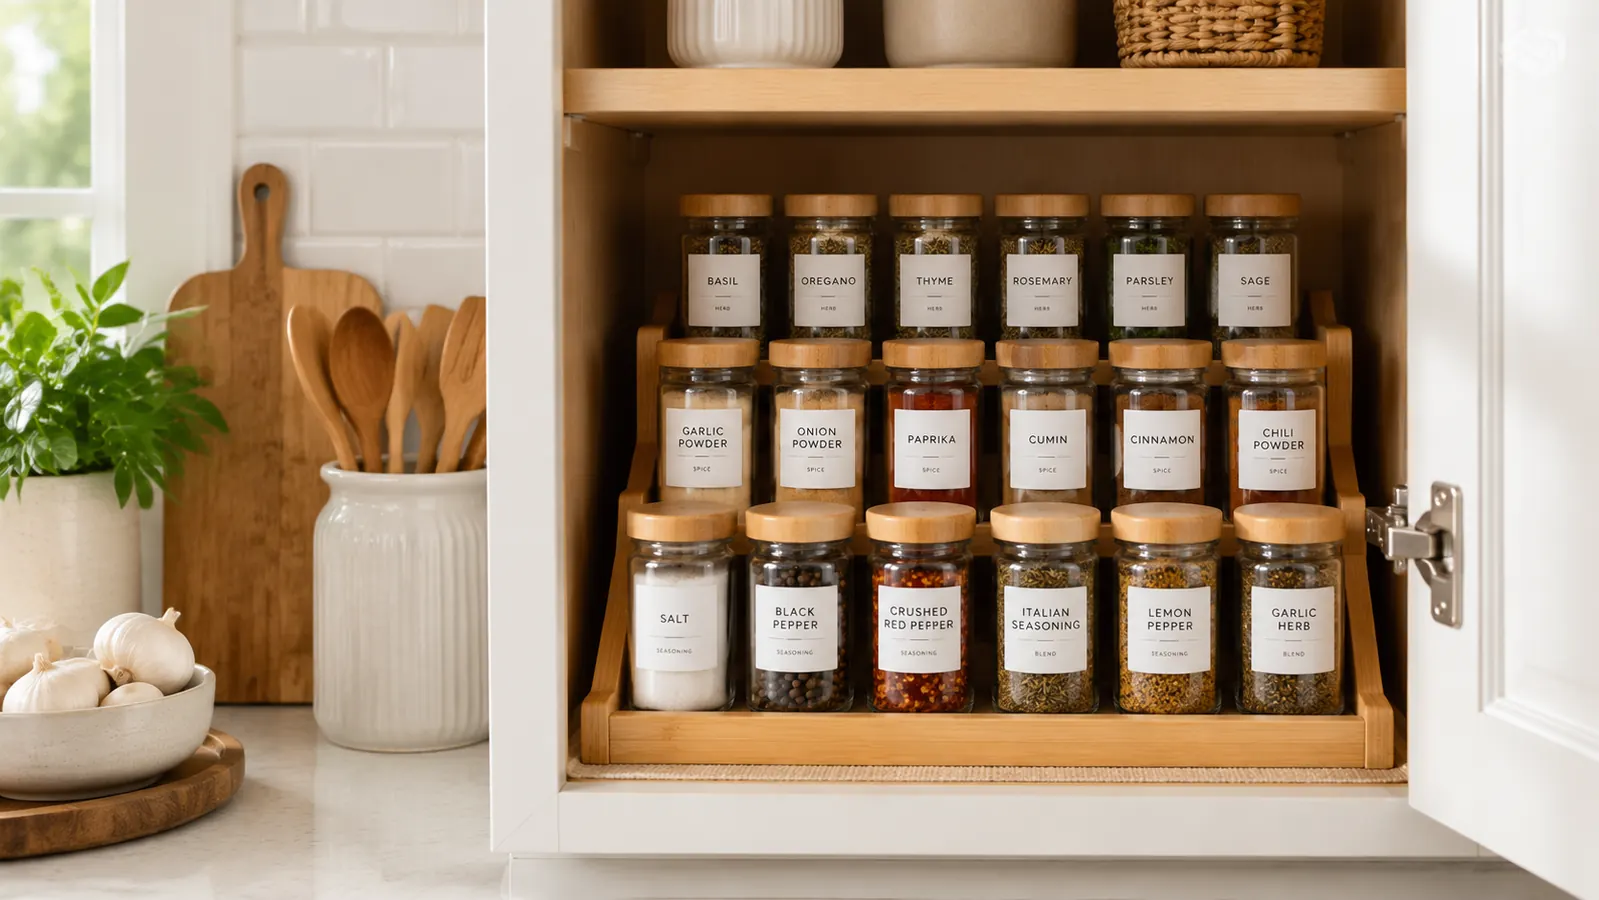
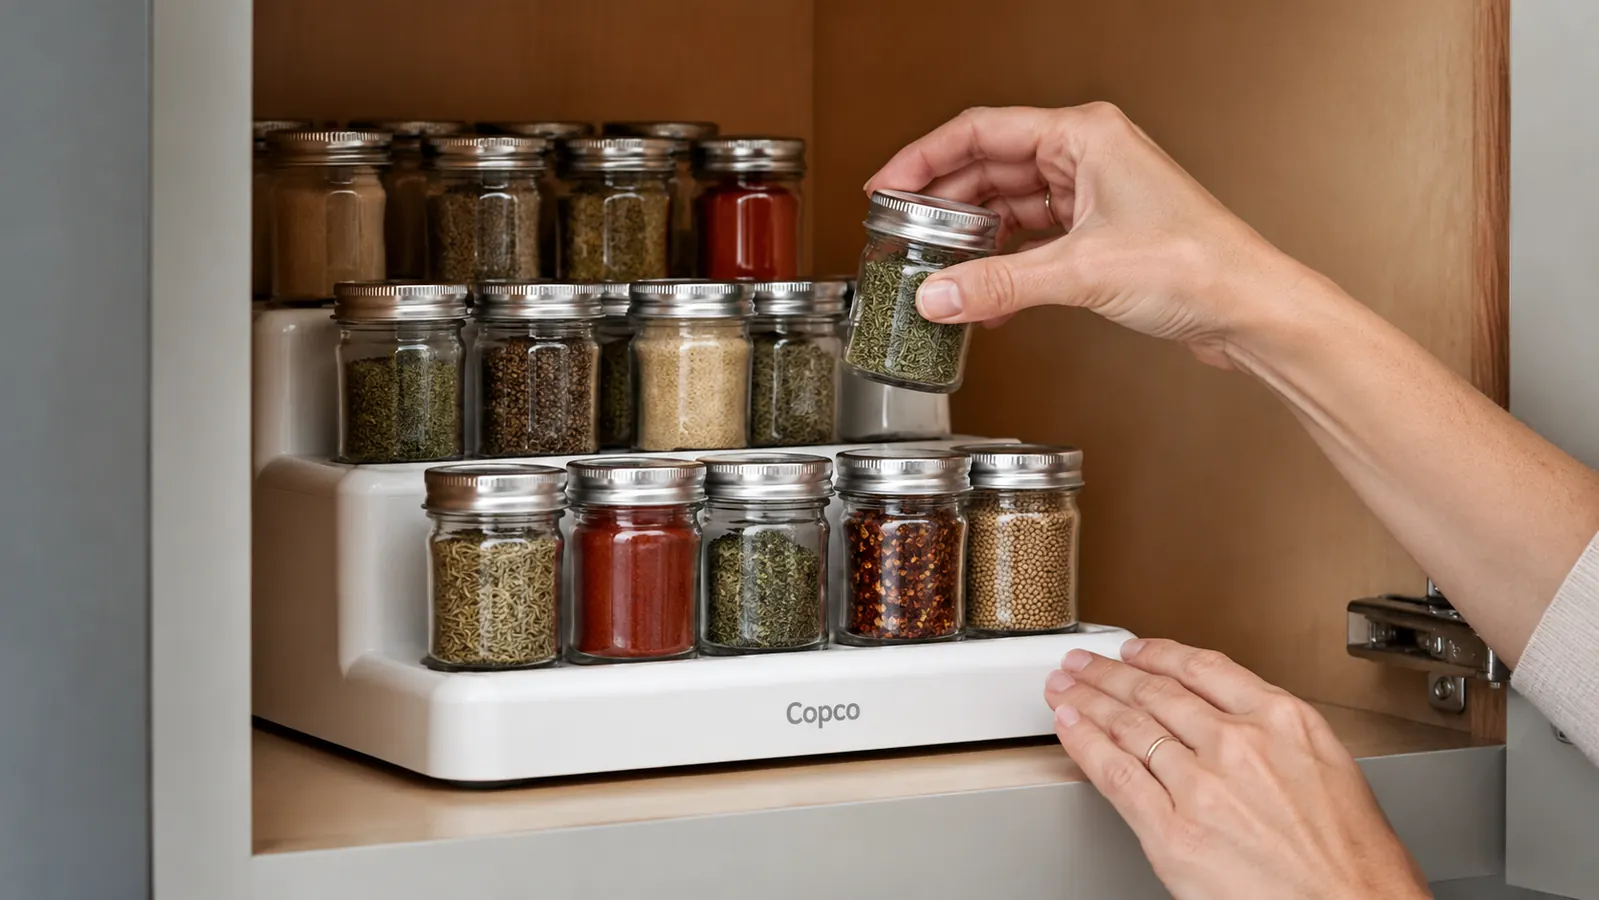
The Copco 3-Tier Cabinet Spice Rack is the tool I use and recommend. It holds up to 21 standard spice jars, no assembly required, and it fits a 10-inch-deep cabinet shelf out of the box. Over 60,000 Amazon reviewers agree it is worth every penny.
Amazon Check Today's Price on Amazon →Step 1: Pull Everything Out and Actually Look at What You Have
The temptation is to organize around what is already in the cabinet. Resist it. Pull out every single jar, bottle, and packet and set them on your counter. This takes about three minutes and it pays off immediately because you will almost certainly find duplicates (two oreganos, three garlic powders) and expired jars you forgot existed. Check the dates. Anything that has been open for more than two years has faded in potency even if it technically has not expired, and a reorganized cabinet is a perfect opportunity to start fresh with the jars that actually earn their shelf space.
While the shelf is empty, wipe it down with a damp cloth. Spice dust and cooking oil mist accumulate under jars without you ever noticing. A clean, dry shelf also helps the rack sit flat and stable. If your shelf is very slick, a small piece of shelf liner under the rack adds grip and takes ten seconds to cut and place.
Sort the jars into rough groups as you go: baking spices together, savory cooking spices together, blends and rubs together, extras and duplicates to the side. You are not building the final system yet, just getting familiar with what you actually have. Most people discover they have far fewer jars than they thought once the mystery doubles are removed.
Step 2: Measure Your Cabinet and Confirm the Rack Fits
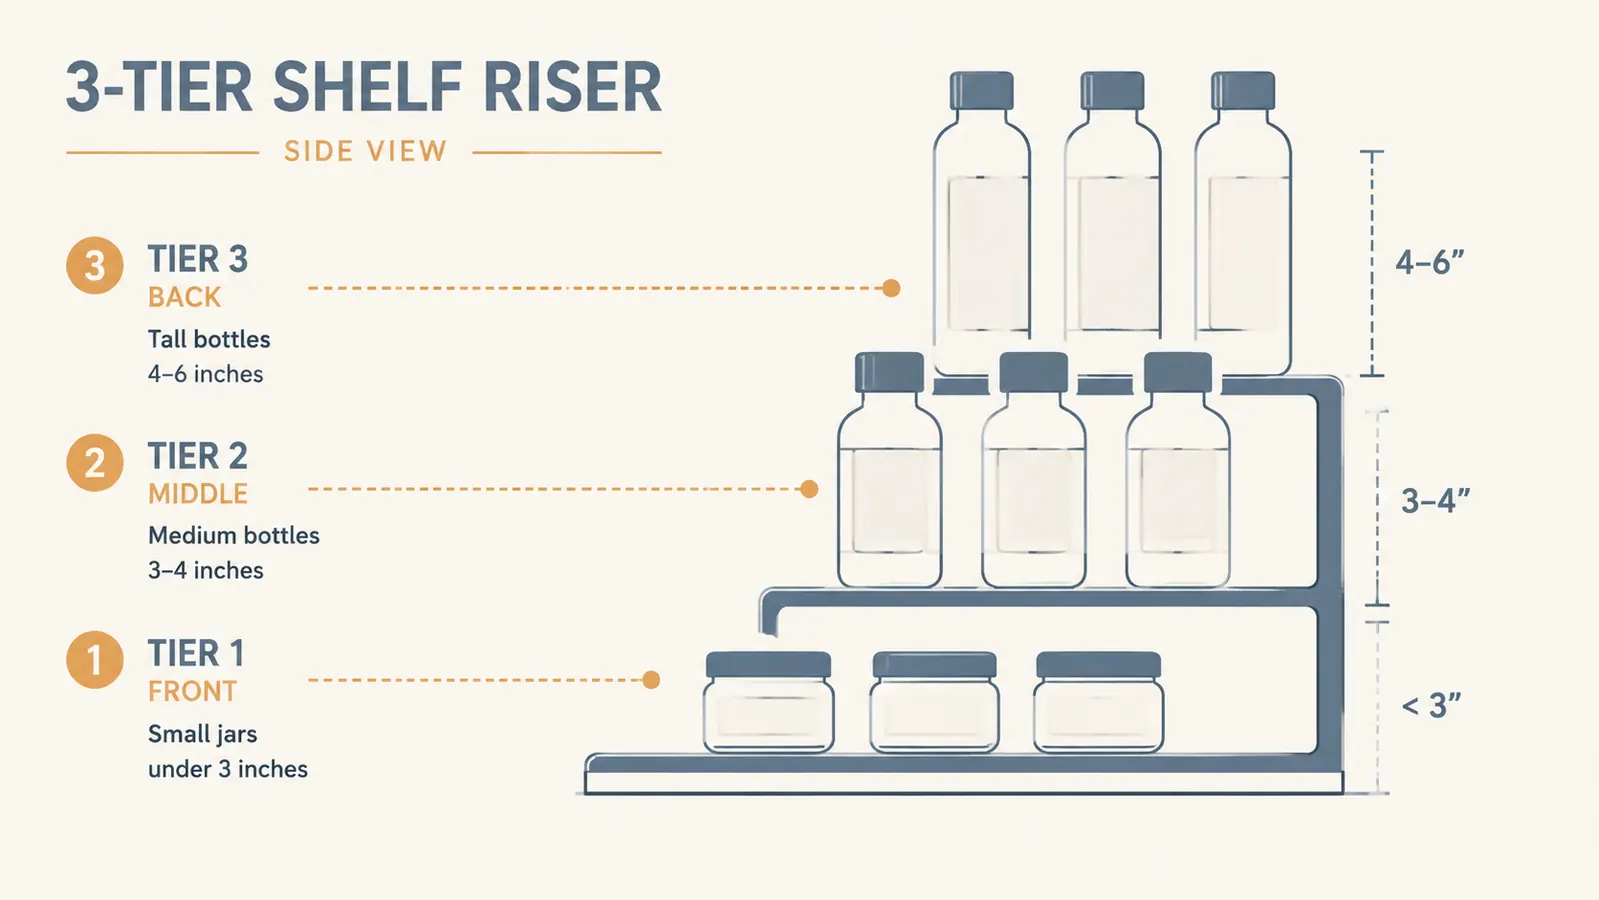
The Copco 3-Tier Spice Rack is 10 inches deep, 10.5 inches wide, and about 4.5 inches tall at its highest step. Before you set it in place, measure the interior depth of your cabinet shelf and the clearance between shelves. You need at least 5 inches of vertical clearance for the rack to sit comfortably and still let you slide a standard spice jar onto the top tier. Most kitchen cabinets and pantry shelves have 10 to 14 inches between shelves, so clearance is rarely the issue. Depth is where people run into trouble. A 9-inch-deep shelf will let the rack hang over the edge slightly, which is not ideal. A 10-inch or deeper shelf gives you a clean fit.
If your cabinet is narrower than 10.5 inches, the rack still works, but you may need to angle it slightly or trim it if the material allows. The Copco is molded plastic, so you will not be trimming it. Instead, for very narrow cabinets, consider placing the rack sideways and using the steps front-to-back rather than side-to-side. It is a less conventional placement but it still creates the tiered visibility that makes the whole system work.
Step 3: Sort Your Jars by Height Before You Place the Rack
This is the step most people skip and then wonder why their cabinet still feels cluttered. Tiered racks work because taller items go in the back and shorter items go in the front, so your eye can see every label at once. Before you put the rack inside the cabinet, sort your jars into three rough height buckets right there on the counter. Tall bottles, four to six inches, go on the highest rear step. Medium jars, three to four inches, go on the middle step. Small tins and short jars under three inches go on the lowest front step.
Do not worry about alphabetical order yet. Height-first is the rule. Alphabetical order within a height group is a nice bonus but it is optional and it breaks down the moment you run out of one spice and replace it with whatever was on sale that week. Height order, on the other hand, is permanent. The tiers enforce it automatically. Once you adopt this approach, you never have to excavate the back row again.
Step 4: Place the Rack and Load It from Tallest to Shortest
Set the rack into the cabinet and slide it toward the back of the shelf so the front step sits near the shelf edge. This maximizes visibility when you open the door. Now load it starting with your tallest bottles on the top rear step. The Copco's rear step is the highest, which is counterintuitive when you first look at it, but it makes sense once the jars are in place. Your tall vanilla extract, your large bottle of Italian seasoning, anything over four inches, goes here. Place them label-forward so you can read the front of every jar.
Move to the middle step next. Standard-height spice jars, the kind that come in the classic McCormick or Badia bottle, typically fit perfectly here. Work your way through your savory cooking spices: cumin, coriander, chili powder, turmeric, whatever you reach for on a weeknight. Finally, fill the front low step with your small tins, tasting-size jars, and anything short enough that it would have hidden behind a bigger bottle in the old flat setup. By the time you are done, you should be able to see every single label from the door.
Step 5: Label the Groups and Establish a Restocking Rule
The cabinet stays organized long-term only if you have a one-sentence rule for restocking. Mine is: when a jar comes back into the house, it goes back to its height group, not wherever there is a gap. That is it. Without a rule, the next grocery run produces one new tall bottle that gets jammed into the front step because it was the nearest open spot, and within three weeks you are back to the pile.
If you want to go one step further, grab a label maker or even just a strip of masking tape and mark the three zones on the shelf itself: Tall, Medium, Short. You do not need to label every individual jar unless you want the ultra-tidy look. The zone labels are enough to remind anyone who lives in your house where things belong. My kids have actually started putting spices back in the right spot since I added the tape labels, which is something I genuinely did not expect.
A restocking rule also tells you when the system is full. When the rear step is overflowing with tall bottles, that is your signal to audit and purge before buying more. An organized cabinet is not one that holds everything you have ever purchased. It is one that holds what you actually use.
What Else Helps: Building on the Tiered Rack System
A spice rack solves the visibility problem, but it shares the shelf with other things in most kitchens. If your cabinet also holds baking supplies, oils, or vinegars, grouping them intentionally extends the same logic. Keep the rack on one side of the shelf and dedicate the other side to a single category, like baking. Tall baking supplies go against the wall, shorter ones in front. You are recreating the tiered-rack principle even without a second rack.
Clear, stackable bins work well on the shelves above and below your spice rack to hold packets, seasoning mixes, and anything that is too awkward for the rack itself. The goal is not to organize every square inch in one session. Start with the spice rack, live with it for a week, and then tackle the next zone once you see how much cleaner one shelf already feels.
Once you can see every spice label from the door, cooking gets genuinely faster. You stop second-guessing whether you have something and start reaching for it on reflex.
If your pantry cabinet is deep enough to hold two racks side by side, the Copco's 10.5-inch width makes that work in most standard cabinets. Two racks next to each other gives you six total tiers and enough space for forty or more jars, which covers most home spice collections with room to spare. You do not need to buy a specialty double-rack. Two of the same Copco units placed side by side costs less than a single specialty organizer and gives you more flexibility if your needs change.
The only thing that does not work well with this system is very deep, large-format containers like a one-liter olive oil bottle or a tall glass jar of pasta sauce. Those live better flat on a deeper shelf or in a cabinet door organizer. The tiered spice rack is sized for spice-scale jars, not full-size pantry goods. Knowing what the tool is for is part of knowing how to use it well.
Ready to see every spice label the moment you open the door?
The Copco 3-Tier Cabinet Spice Rack is the simplest upgrade your pantry cabinet can get. No tools, no assembly, and it lands in a couple of days. More than 60,000 people have already made this exact swap. Check the current price and see how it looks in real kitchens.
Amazon Check Today's Price on Amazon →For more on how the Copco spice rack holds up over months of daily use, including its stability on slick cabinet shelves and how the tiers handle odd-shaped containers, read the full Copco spice rack review. And if you are deciding whether a tiered rack or a drawer insert makes more sense for your space, the comparison of these two approaches lays out when each one wins. Either way, the best time to fix a chaotic spice cabinet is the next twenty minutes you have free.